Note our Electronic Signature API has 2 parts: Inbound & Outbound
- eSign / eDocs: Inbound: Inject variables into a contract or doc to be signed. This can even include a base 64 image (say, for an X-ray image, or driver’s license)
- eSign / eDocs: Outbound: Notification when a doc is signed, including with the URL of the signed doc <requires permissions and IP restriction to download>
INBOUND Electronic Signature / eDocs API
GOAL (Most Common):
Send variables into an e-Sign Contract.
METHODS:
- POST (simple and fast)
- GET (URL string)
- API (below)
NOTE: API in is easy, there’s no security risk. API outbound, for security reasons, is much more restrictive. You will need API keys and IP based restriction on outbound APIs.
POST (METHOD 1)
You can simply post any variables into a SwiftCloud doc, and as long as the variable matches, SwiftCloud will handle the rest. You can add “readonly” into the shortcode to make it look like regular text, not front-end-editable.
Post location: Simply post right to your actual doc URL. Ensure the variable names match in the source-code, and we’ll do the rest. You can optionally include hidden variables (like session ID, tracking variables).
NOTE: Inbound API is throttled. If you are running TV ads or expect a large number of submissions in a short time period, let us know.
GET (METHOD 2)
Simply append any variable to the end of your eSign doc / eDoc / Landing Page / Scheduler / etc – i.e.
https://[email protected]&extra_sessionID=1234
More Common Use Cases
- Facebook Lead Form Ads – Will notify you, create the workroom, fire autoresponder messages, create the contact
- Zapier, IFFFT, Tray.IO, n8n.io (API bridge systems) integrations
- WordPress Forms for lead capture etc.
- Any other data capture, lead capture
API INBOUND (METHOD 3)
Below is details for our incoming API using Json.
HOW TO USE IT
- Create a Form same as usual – go to your main drive page. Click the orange Create New button, select Form, and give it a name (just for you, not visible to clients). Move to a subfolder if you choose.
- Next, at the very top, choose API or Facebook. Both do the same, but Facebook will help you connect directly.
- In the pink box, set what you want to happen for the guest / client / form-filler – what email they should get if any, and any optional sequence of messages.
- In the blue box, set your own notification options. Email you? Email someone else? Configure as needed
- You’re done – most likely. More advanced optional controls are available in the grey box for non-english language controls, etc.
CODE EXAMPLE
Note 2 bits of data are always required for the absolute bare minimum:
- Form ID
- Email*
*Note we may soon allow mobile phone (with SMS verification); if you need this let us know.
POST TO: https://swiftcrm.com/is/api/formhandlings
Login is not required. No data can be retrieved from this API. We may add IP restriction down the road if needed.
Set the header for API : Content-Type : application/json
NOTE: KNOWN ISSUE: Underscore _ is not allowed in variable names. This message will be removed when solved; for now just please use – hyphen instead of _ underscore in the variable names.
{"formid":"233F283",
"swift_name_both":"Tester Name",
"email":"[email protected]",
"FundsNeededFor":"new tractor"}
API Response:
success, fail
As always, if you have any questions let us know and we’ll update this entry to be more clear.
OUTBOUND Electronic Signature / eDocs API
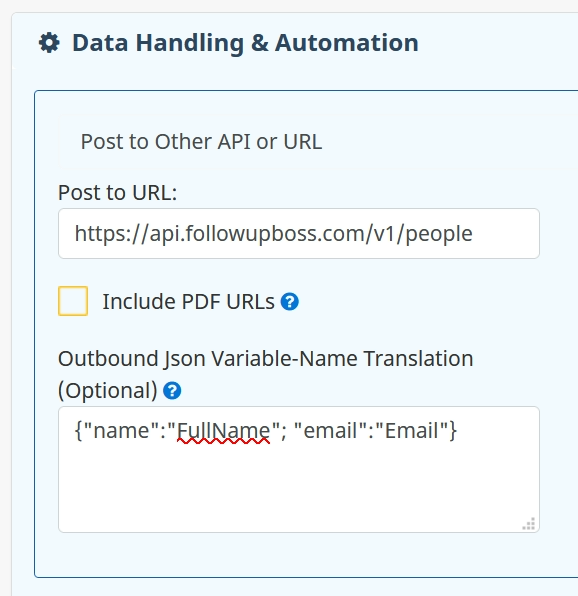
Most common: Simply select the Remote Post option in the blue box on a form, doc, chatbot, landing page, etc. and define the remote URL.
Inside the Json Variables you can also include necessary items like a security token, your User ID, etc – variables that do not exist on our system. If SwiftCloud does not recognize the us-variable, we’ll just ignore it.
If you wish to store the PDFs (eSign, Invoices) remotely, check the box. It will ask for your IP address of the remote server; we’ll override privacy settings on PDF-retrieval if the request originates from that address. A security token is also required, which you can find on your User Profile >> Accessing SwiftCloud; this must be passed with each request.
Your remote system must originate the PDF-request – i.e. you pull it. This allows you to pull it anytime, or pull only what’s needed, or pull after certain conditions are met such as all parties of signed a doc and not just some of them.
You must have a static IP address for this (all websites do, but if you’re looking to connect a local point-of-sale cash register etc, this may be a bit more complex).
